LangSmith: Debug, Trace, Evaluate and Monitor LangChain-powered LLM-Apps
Streamlining the Journey from Language Model Prototypes to Production with LangSmith: An Overview

In the last article we built a simple chatbot class that can answer questions about a specified document and used it as a command line application.
Now we want to give our bot a web interface so that we can use it in the browser as well. Gradio and Streamlit are popular frameworks for this purpose within the data science community. While Gradio seems to be most suitable for quick demos of machine learning models, Streamlit appears more suited for the development of somewhat more extensive (internal) data apps. For this reason, we are using Streamlit for our chat web interface.
Spoiler: For a productive application with many users, complex UIs or nested state, we would definitely choose a different solution, as we see some limitations with both frameworks. The “classic” web frameworks and architectures seem to us to be better suited, especially from an engineering perspective, for more extensive applications and systems. If you want to use pure Python, you can take a look at Solara .
Streamlit is a powerful tool that simplifies the process of turning your Python scripts into interactive web applications with minimal effort. It’s designed for people who may not have extensive web development experience but want to create user-friendly and functional web interfaces for various purposes. Whether you’re a data scientist, developer, or simply someone who wants to share data-driven insights, Streamlit can be your go-to solution.

One of the standout features of Streamlit is its simplicity. With just a few lines of Python code, you can create web apps that display data, charts, and more. Streamlit also supports easy integration with popular data visualization libraries like Matplotlib and Plotly , making it suitable for data-driven applications.
Another significant advantage is that Streamlit doesn’t require you to worry about complex web development concepts like HTML, CSS, or JavaScript. Instead, it uses Python syntax that you’re already familiar with. Streamlit also handles the backend for you, allowing you to focus on building the frontend and user experience. Additionally, it provides tools for caching, so you can optimize performance when dealing with data-heavy applications.
Streamlit finds applications in various fields. For data scientists, it’s a valuable tool for creating interactive data dashboards, conducting exploratory data analysis, and showcasing machine learning models. Developers can use it to rapidly prototype and deploy web apps, saving time and resources. Streamlit also allows educators to create interactive tutorials and demonstrations.
In summary, Streamlit is an accessible and efficient solution for turning your Python scripts into interactive web apps. Its simplicity, integration capabilities, and suitability for data-driven tasks make it a versatile tool for individuals across different domains, from data science to software development. Whether you want to share data insights or create user-friendly interfaces, Streamlit can help you achieve your goals with ease.
Before we start, let’s take a look at some of the key concepts in Streamlit. If you are used to traditional web-frameworks, you will notice that Streamlit is quite different.
First, you have to run your Streamlit-powered app with the streamlit command, e.g.
streamlit run your_script.py [-- script args]. This will spin up a local
Streamlit server and open a browser window with your app.
You can run your app as Python module or even by specifying a URL, e.g. to a gist.
Streamlit apps are stateless by default. This means that every time you interact with your app,
the entire script is rerun from top to bottom. This is different from traditional web
apps, where the state is stored on the server and only the relevant parts of the app
are updated when you interact with it.
Obviously we do have some state in our app, e.g. the chat class that contains the
reference to the document that we want to chat about or the chat history.
We will use the st.session_state to cache our state and prevent it from being
recreated on every interaction.
With Streamlit, you can use straightforward Python code to generate data visualizations, tables, charts, and more, all with minimal effort. You can customize the appearance of your data by applying various styling options, such as changing fonts, colors, and layouts. Streamlit’s intuitive API and rapid development capabilities make it an excellent choice for data professionals and developers looking to quickly share and visualize their data-driven insights in a user-friendly web interface.
Please use the project directory where you have placed the docchat.py from the last post and
add a new file docchat_streamlit_ui.py. We need to import our DocChat and Document classes,
so that we can build our UI for the functionality that we have already implemented.
We have published the complete code for the previous and this article in a Github-Repository .
We start our program with the creation of a DocChat instance. We only want to create this instance once, so we keep it in the session state. This way, the instance is not recreated on every interaction with the app.
This is important: on every interaction with the chat, e.g. if you type in a new question and hit enter, the entire script is rerun from top to bottom. This means that we have to be careful not to recreate our DocChat instance on every interaction, take the uploaded document, create embeddings and so on. If you do not use the session or cache correctly, the chat might seem to work, but it will be very slow and consume a lot of resources and cost you money for the repeated calls to the OpenAI Embeddings-API.
Next we implement the UI. First we set the page title and a title for our app and create
the sidebar containing the file upload widget. The handling of the file upload is a little
bit tricky, as we want to prevent the app from creating embeddings for the uploaded document
on every interaction. We use our doc_chat instance from session to cache the document name
and only create embeddings if the name of the uploaded document has changed - this is the
recommended workaround for the current behaviour of the Streamlit upload component.
The main chat area is created using the Streamlit Chat Elements
with st.chat_input()
and st.chat_message().
Besides that we only have to keep the chat history and figure out, when to call our doc_chat
instance to generate a response for the current user question. We do this, if the last message
is not from the assistant.
docchat_streamlit_ui.py:
import os
import streamlit as st

from docchat import DocChat, Document, ChatResponse

# please note that the location of this function has changed multiple times in the last versions of streamlit
from streamlit.runtime.scriptrunner import get_script_run_ctx
# if run directly, print a warning
ctx = get_script_run_ctx()
if ctx is None:
    print("************")
    print("PLEASE NOTE: run this app with `streamlit run docchat_streamlit_ui.py`")
    print("************")
    exit(1)

print("Starting")

# we only want to create this doc_chat once, so we keep it in the session state
if st.session_state.get("doc_chat", None) is None:
    print("Creating DocChat instance")
    st.session_state["doc_chat"] = DocChat()

doc_chat = st.session_state.get("doc_chat", None)


st.set_page_config(page_title="attempto Lab Chat - An LLM-powered Streamlit app")
st.title('💬 attempto Lab Chat App')

with st.sidebar:
    st.header('Document')

    uploaded_file = st.file_uploader("Upload your Document", type=["pdf"])
    # be aware, that this is not reset when you reload the page, so you will always see the last uploaded file
    if uploaded_file is not None and (doc_chat.doc is None or not uploaded_file.name == doc_chat.doc.name):
        local_file = os.path.join("docs", uploaded_file.name)
        with open(local_file, "wb") as f:
            f.write(uploaded_file.getbuffer())
        with st.chat_message("assistant"):
            with st.spinner("Processing..."):
                try:
                    embeddings_count = doc_chat.process_doc(Document(uploaded_file.name, local_file))
                    st.success(f"Using document {uploaded_file.name}")
                    st.success(f"Created {embeddings_count} chunks/embeddings")
                except Exception as e:
                    st.error(f"Error: {e}")

# Store AI generated responses
if "messages" not in st.session_state.keys():
    st.session_state["messages"] = [{"role": "assistant", "content": "I'm attempto Lab Chat, How may I help you?"}]

# Display existing chat messages
for message in st.session_state["messages"]:
    with st.chat_message(message["role"]):
        st.write(message["content"])


# Function for generating LLM response
def generate_response(question: str) -> ChatResponse:
    print(f"generate_response: {question}")
    try:
        return doc_chat.get_response(question)
    except Exception as ex:
        error_msg = f"Sorry, an error occurred: {ex}"
        return ChatResponse(answer=error_msg)


# Prompt for user input and save
if prompt := st.chat_input():
    st.session_state.messages.append({"role": "user", "content": prompt})
    with st.chat_message("user"):
        st.write(prompt)

# If last message is not from assistant, we need to generate a new response
if st.session_state.messages[-1]["role"] != "assistant":
    # Call LLM and process response
    with st.chat_message("assistant"):
        with st.spinner("Thinking..."):
            response = generate_response(prompt)
            st.write(response.answer)
            if response.db_source_chunks not in [None, []]:
                sources = [x.metadata for x in response.db_source_chunks]
                # unique sources
                unique_sources = [dict(s) for s in set(frozenset(d.items()) for d in sources)]
                # sorted by page
                sources = sorted(unique_sources, key=lambda s: s['page'])
                st.dataframe(data=sources, column_config={"source": {"label": "Document"}, "page": {"label": "Page"}})
                st.caption('Sources for the answer above :sunglasses:')

    message = {"role": "assistant", "content": response.answer}
    st.session_state.messages.append(message)
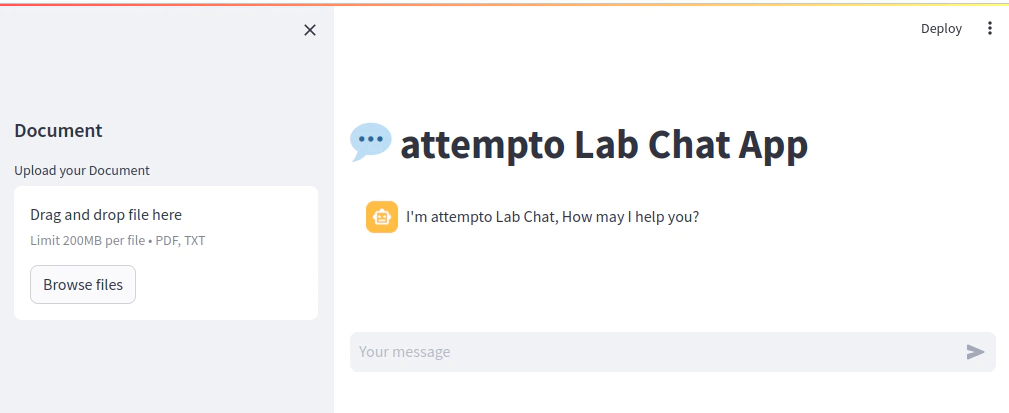
Start your web app with pipenv run streamlit run docchat_streamlit_ui.py, it starts and
opens a browser window. You should see the following UI:

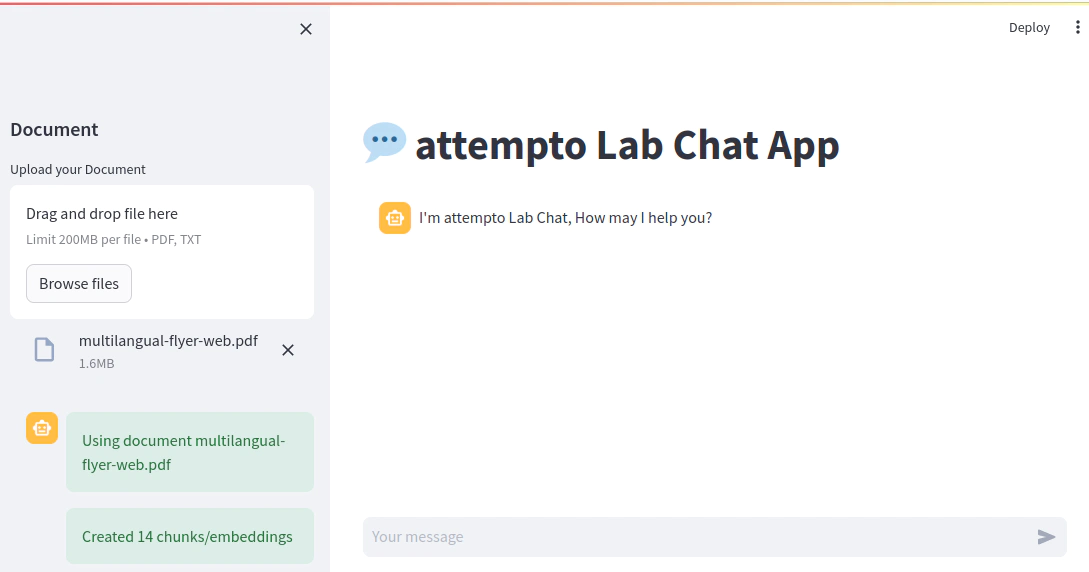
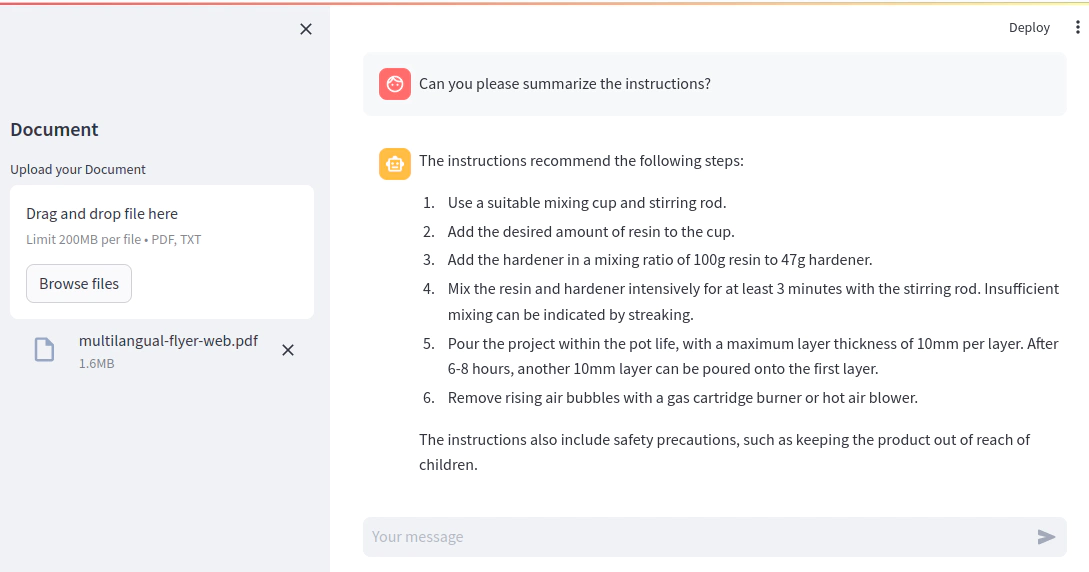
Now upload a PDF document containing text and the system will process it, split it into chunks and show you how many embeddings it has created. You can now ask questions about the document.

You can ask questions about the content of your document. Currently, we do focus only on the last uploaded document and forget about previous documents. The name of the document is shown in the sidebar.

Because of the nature of the retrieval augmented generation, you can not ask the system to summarize your document, because the system does not know about the specific “document” as a whole - it instead will try to search for semantically similar chunks of text from the document by using the embeddings created from your question.
If you have started the app multiple times in a row during development you may notice at some point, that there are multiple “Starting” and “Creating DocChat instance” messages in the console output right after the start of the app.
Starting
Starting
Creating DocChat instance
Creating DocChat instance
This may happen because there are now two or more browser tabs open with the app. Streamlit has a development mode, where it will reload the app on every change of the source code. For this reason, a little agent runs in every browser tab and communicates with the server - if the agent detects that the server has been restarted, it will reload the page and cause a log line to be printed. This is not a problem, but it may be confusing.
If you are like me and forget to start the Streamlit app using streamlit run, you can
add the following code to the top of your file, so that the program prints a warning,
if it’s run “directly”.
# please note that the location of this function has changed multiple times in the last versions of Streamlit
from streamlit.runtime.scriptrunner import get_script_run_ctx

# if run directly using Python, print a warning
ctx = get_script_run_ctx()
if ctx is None:
    print("************")
    print("PLEASE NOTE: run this app with `streamlit run docchat_streamlit_ui.py`")
    print("************")
    exit(1)
Creating a web interface for our chatbot using Streamlit was a fairly straightforward process, although we did encounter a few challenges. One notable issue was finding a workaround to stop our application from generating embeddings for uploaded documents during every interaction. Additionally, it’s important to have a good grasp of Streamlit concepts and, in particular, understand how data flows. Fortunately, the documentation is well-detailed, and there are plenty of examples available to help you along the way.
Have fun with the bot, extend as you like and let us know if you have any questions or suggestions!

Streamlining the Journey from Language Model Prototypes to Production with LangSmith: An Overview

Unlocking personal conversations with LangChain: building smart Chatbots that understand your documents using Retrieval-Augmented Generation (RAG)